Mass Import & Export Of Zone File
The below guide will walk you through how to both input and output/dump a DNS Zone file on the Primus/Magma DNS Servers.
- Log into the MyAccount Portal (http://myaccount.primus.ca) - If you do not have MyAccount portal access, please contact our support staff at 1-888-222-8577 to have your access configured.
- Click on "Advanced Records"
- Under "Domain Name Records" find the domain in which you wish to work with and
click on the name. You will be able to identify if you have DNS Services with
Primus/Magma, as there will be a "X" under "Primary & Secondary DNS"

- The page will refresh to a new page. Find and click on "Primary DNS
Services"

- You will now be presented with a page to modify your DNS Zone file.
MASS IMPORT OF ZONE FILE RECORDS:
- If you wish to import a large quantity of zone files at one time, click on
"Mass Import".

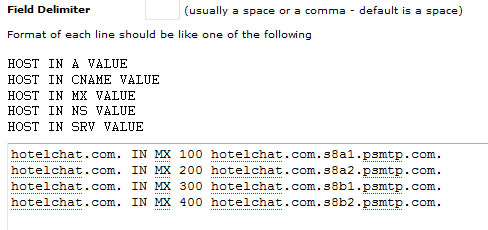
- Input your zone file in the syntax requested (HOST IN RECORDTYPE VALUE). The
default delimiter between variables will be a space, however you may also specify
this in the field above. Below is an example for the default Primus/Magma MX
records for the domain "hotelchat.com". If you wish to import the default
Primus/Magma MX Records for your domain, simply replace "hotelchat.com" with your
own domain.

- Once completed, click on "Import".
- If there are specific errors, they will be reported to you.
EXPORT / BACKUP OF ZONE FILE RECORDS:
- If you wish to "backup" a zone file, you may utilize the "Mass Export" bottom.
This will present you with a raw text output of your zone file for easy copy and
backup should you wish to migrate your file or back it up for reference prior to
changes.

Check network status

